Chapter 1:
Introduction

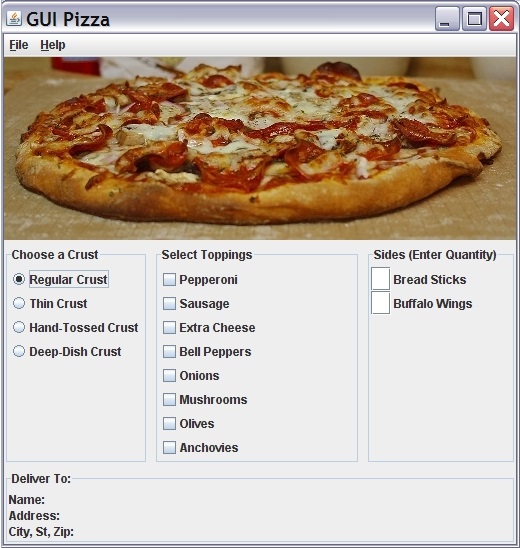
Last time, we started a rather ambitious project. Our goal was a program that would produce and process this window:

Our GUI Pizza application

Our GUI Pizza application

We weren't able to finish it in one lesson, so we're going to continue working on it today. (We'll finish it this time!)

Last time, we got everything to show up in the window except the bottom section, with the title Deliver To:. That's where we'll start today.

Just in case anyone needs or wants it, click below for my version of the program so far.

Our GUI Pizza application so far

Chapter 2:
The Last Region

The last panel to implement in our window uses components we've seen before, so you won't need to learn anything new for it. It will be a chance to review and reinforce some of what you have already learned. Let's start with a look at what goes into the south region of the window.

We know we'll need a panel because there are multiple components to put into the south region. We have some text fields where we want users to enter data. To the left of those, we have some labels to prompt the user on what to enter. To manage those two groups of components, we'll use subpanels. We'll need one subpanel to organize the labels and another to size and line up the text fields the way we want them. Last, there's a border around the whole outer panel to tie the pieces together.

To begin, let's create a method named makeSouthRegion() that will set up the south region of the screen. Like we did with the other four regional methods, we'll add a call to this method to our makeContent() method, like this:

    makeSouthRegion();


The first thing to do in makeSouthRegion() is to set up the outer panel, along with its layout manager and border. Here's how we'll do that:

    private void makeSouthRegion()
{
JPanel panel = new JPanel(); panel.setLayout(new BoxLayout(panel,BoxLayout.X_AXIS)); panel.setBorder(BorderFactory.createTitledBorder("Deliver To:"));
}

TQA-25 --- The first line of the makeSouthRegion() method creates our outer panel, a new JPanel object named panel. The second line sets that panel's layout manager, and since we want our two subpanels side by side, we'll use the BoxLayout manager with its X_AXIS option. The third line puts a border around the outer panel using the same format that we used for our other regions, with the title we want it to show: Deliver To:.

Now we're ready to work on the subpanels. We'll start with the left one, which holds the text labels. First, we need to create the subpanel. Then we'll need to set up its layout manager. Since we want the labels to line up one above the other vertically, we'll use the BoxLayout again, but this time we'll use its Y_AXIS argument, like this:


    JPanel smallPanel = new JPanel();
smallPanel.setLayout(new BoxLayout(smallPanel,BoxLayout.Y_AXIS));


The first line above creates another JPanel object and names it smallPanel. The next line sets its layout manager. Once we take care of those, we can add the labels, like this:


smallPanel.add(new JLabel("Name:"));
smallPanel.add(new JLabel("Address:"));
smallPanel.add(new JLabel("City, St, Zip:"));


Since we don't need to refer to these labels again, we don't need to give them names when we create them. We can add the objects directly to the subpanel.

Once that's done, we're ready to add the subpanel to the outer panel with one line that looks like this:


    panel.add(smallPanel);


If we want to view the window now to see how the labels look, we just need to add one more line to put our outer panel into the south region of the window:


    contentPane.add(panel, BorderLayout.SOUTH);


Running the program at this point gives us this:

Window with labels

Window with labels

TQA-23 --- All that's left to add (visually) are the text fields to receive the name and address information. We can reuse our subpanel variable, smallPanel, since the object it refers to is already added to the window. Now we'll create a second subpanel object, give it a layout manager, and add the text fields to it, like so:


    smallPanel = new JPanel();
smallPanel.setLayout(new BoxLayout(smallPanel,BoxLayout.Y_AXIS));
nameText = new JTextField();
addressText = new JTextField();
cityText = new JTextField();
smallPanel.add(nameText);
smallPanel.add(addressText);
smallPanel.add(cityText);


Since we'll refer to the text fields again in another method, we had to connect them to available names. We used the variable names we declared at the start of the class for that purpose: nameText, addressText, and cityText.

Once we've created the JTextField objects and added them to the subpanel, we add the subpanel to the outer panel with this line again:

    panel.add(smallPanel);


The south panel now looks like this if we run the program:

Panel with labels and text fields

Panel with labels and text fields

It's all there now, but it's a little crowded, especially between the longest label (City, St, Zip) and the text field to its right. So the last thing we'll do in the south region is add a little space between the components with an empty border, one with no titles, lines, or anything else to mark its edges. It just adds some space to distribute the components better. We'll add the empty border to both subpanels with this line of code:


    smallPanel.setBorder(BorderFactory.createEmptyBorder(3,3,3,3));


That line adds an empty border three pixels wide on all four sides of the subpanel. The four numeric arguments give the number of pixels for the top, left, bottom, and right borders, respectively. If we want a larger border in any direction, we can get it by changing just that number.

Remember to add the line twice, once to each subpanel, before adding the subpanels to the outer panel.

If you run the program now, it should open a window that looks almost exactly like the one at the start of the lesson. The only difference is that in the window at the beginning of the lesson, I also added a small empty border (six pixels on each side) to the entire content pane, giving it a little room around the edges so the components don't bump up against the side of the window. If you want to add that border, I'll leave it to you to do in the makeContent() method.

If you have problems with anything we've gone over so far,
let me know in the Discussion Area.

Chapter 3:
Making the Menus Work

Now that our window is visually complete, we need to make the rest of the menu options work. There are four menu items, and right now only two of them work (Exit and About GUI Pizza). The other two (New Order and Save Order) don't do anything yet. We want the New Order menu item to reset all the buttons and fields to their original values, as if we had just opened the window. When users want to erase everything they've done and start the order over, they can use this item. The Save Order button will write all the order information to a text file that can be printed or displayed. We're going to start with the New Order option, since it's the easier of the two. Then we'll finish up with the Save Order option.

To initiate our processes, we're going to use event listeners, but we'll take a somewhat different approach to how we use them than we did earlier. In previous projects, we assigned listeners to every item in the window that we wanted to interact with. We could do that this time, too, and attach a listener to each radio button, check box, and text field. Then, every time the user changed any one of them, we could check its contents and keep track of what our user is doing on the screen.

But this time there's one big difference: We don't care how many times a user changes any of the fields or buttons in our window. We don't need to trigger an event and check values each time something changes. If we have users who can't decide which crust they want or which toppings they like, and who keep clicking different options or changing side order numbers, we would be triggering events all the time that won't matter.

All that matters in this window is what the values are when our user finally clicks the Save Order menu item. The About GUI Pizza and Exit menu items completely ignore what is on the screen. Our New Order menu option will set the values of the components, but it doesn't care what is in them when a user clicks it. The only time the settings of the fields and buttons matter is when the user clicks the Save Order menu option.

So here's what we'll do: We won't attach listeners to any of the buttons or fields in the window. We don't need to. In fact, a component can have any number of listeners, including none, but that's a topic for another time. We're just going to set up event listeners for the two menu items we still need to finish. The New Order listener will simply reset the values of all the buttons and fields in the menu. The Save Order listener will check the values of all the buttons and fields in the window and then create its output file according to their values. We can do that, if you remember, because even though our listeners are objects of another class, that class is an inner class in our program, so it has access to all the data in our outer class, not just to the component it is listening to.

The New Order Option

No matter what changes our user has made to the screen, when he or she clicks the New Order menu option, we want to set all the buttons and fields back to the way they were when the window opened.

That means the Regular Crust radio button should show up as selected, all the check boxes should be unselected, and all the text fields should be empty.

What we need to do, then, is delete the current contents of the actionPerformed() method in NewListener, the listener class for the New Order option. That gives us an empty listener class that looks like this:


private class NewListener implements ActionListener
{
     public void actionPerformed(ActionEvent e)
     {
     }
}
	

Now we're ready to add the code that will reset everything.

TQA-26 --- Let's start with our radio buttons. Radio buttons created from the JRadioButton class all have a method named setSelected() that turns their selections on or off. The method expects a Boolean parameter, so if I give it a value of true, the radio button appears selected. If I give it a value of false, the button appears unselected. Remember that only one radio button in a group can be selected at a time.

To set the Regular Crust radio button on and all the other radio buttons off, I only need one line of code:


regularCrustButton.setSelected(true);
    

Now for the check boxes. The JCheckBox class also contains a setSelected() method, and it works on check boxes the same way as on radio buttons, with one difference. Since any number of check boxes can be selected at a given time, changing one won't affect the others. This means we'll need to go through and turn each one off individually, like this:


pepperoniBox.setSelected(false);
sausageBox.setSelected(false);
cheeseBox.setSelected(false);
pepperBox.setSelected(false);
onionBox.setSelected(false);
mushroomBox.setSelected(false);
oliveBox.setSelected(false);
anchovyBox.setSelected(false);
	

That leaves only the text fields. Text fields built from the JTextFieldclass also have a method to set their contents. In this case, it's the setText() method, and it requires a String argument with the value we want to put into the text box. To clear a text field, all I need to do is give it an empty string for an argument. We'll need to clear each field individually:


breadSticksText.setText("");
buffaloWingsText.setText("");
nameText.setText("");
addressText.setText("");
cityText.setText("");
	

That takes care of our NewListener class definition.

Only one left, our SaveListener class,
which is the event listener for the Save Order option.

Chapter 4:
The Save Order Option

Once our user clicks the Save Order menu option, we want to capture all the information for the order in a text file so we can use it to make what was ordered. We'll need to open a file, write the text to it, and close it when we're done. We did that in Lesson 4, if you remember. (Don't worry if you don't remember all the details. Part of the purpose of this lesson is reinforcement! We'll go over everything again briefly in this lesson.)

Before we do that, though, let's decide what text we want to write to the file. Let's assume our user has ordered a pizza with a deep-dish crust and toppings of sausage, peppers, onions, and extra cheese. (Sounds good to me!) Oh, and let's throw in two orders of bread sticks. For that order, here's how the text description that gets written to the file will look:

    Pizza Order
===========
Crust:
     Deep-Dish
Toppings:
     Sausage
     Extra Cheese
     Peppers
     Onions
Sides:
     2 Bread Sticks
Deliver To:
     A. Name
     123 Some Street
     A Town, ST  12345

*** END OF ORDER ***

This provides an easy-to-read order, with a section in the order for each part of the form on the screen. The Toppings and Sides sections can grow or shrink as necessary. For a plain cheese pizza or an order with no sides, either or both of those sections can even be empty.

There are two ways we can write the order to a file. We can either write each line directly to the file as we decide what to write, or we can build one output string holding the entire order and then write that string to the file all at once. The trade-offs are complexity versus efficiency.

Writing each line of the order to the file as soon as we decide we need it is the simpler route. But the more file reads and writes we do, the less efficient our program is. Given the size of our program, it doesn't really matter, and in some systems, there are sometimes valid reasons for making a choice that is less efficient. But in large, complex systems, efficiency can be very important. And writing to a disk can take tens of thousands, or even hundreds of thousands, of times longer than storing information in memory. So we're going to take the more efficient path and build one output string with the whole order, then write that string all at once as our last action.

The first thing we'll do is take any existing code out of the actionPerformed() method of the SaveListener class, just like we did with the NewListener class. Then we're ready to add our output code. That gives us this class as a starting point:

    private class SaveListener implements ActionListener
{
public void actionPerformed(ActionEvent e)
    {
    }
}


Next, we'll add code to create a String object to hold the text for our order. We will initialize it with the first three lines of the order output, since they're always the same. Our first line of code, then, is this:

    String order = "Pizza Order\n" +
"===========\n" +
               "Crust:\n";


After that, we'll decide which crust is selected and put a line into the order to describe it, like this:

    if (regularCrustButton.isSelected())
   order += "     Regular\n";
else if (thinCrustButton.isSelected())
   order += "     Thin\n";
else if (deepCrustButton.isSelected())
   order += "     Deep-Dish\n";
else if (handCrustButton.isSelected())
   order += "     Hand-Tossed\n";
else
   JOptionPane.showMessageDialog(frame, 
   "You must select a crust type!",
   "Crust Type Error", 
   JOptionPane.ERROR_MESSAGE);


TQA-27 --- This code lets us check the value of each radio button to see if it's selected using the isSelected() method of the JRadioButton class. That method returns true if the button is selected and false if not. Notice that as soon as we find a button that's selected, the rest of the ifs are bypassed by the else part of the if. We only keep checking as long as we haven't found a checked button. That logic works with radio buttons in a group because only one of them can be selected at a time, and we started out with one of them selected as a default option.

If none of the buttons is checked, we know we have an error situation, and we'll pop up a message telling our user about the problem so he or she can correct it.

We'll write the logic for our check boxes in the Toppings section a little bit differently. Unlike with our radio buttons, any, none, or all of the check boxes can be selected. This means we need to go through and check each of them to find out what toppings go in the order. We'll do that like this:

    order += "Toppings:\n";
if (pepperoniBox.isSelected())
   order += "     Pepperoni\n";
if (sausageBox.isSelected())
   order += "     Sausage\n";
if (cheeseBox.isSelected())
   order += "     Extra Cheese\n";
if (pepperBox.isSelected())
   order += "     Peppers\n";
if (onionBox.isSelected())
   order += "     Onions\n";
if (mushroomBox.isSelected())
   order += "     Mushrooms\n";
if (oliveBox.isSelected())
   order += "     Olives\n";
if (anchovyBox.isSelected())
   order += "     Anchovies\n";


The JCheckBox class also has a method named isSelected(), and we use it here to find out which buttons are checked so we can write the corresponding toppings to the order file.

The next thing we need to check is the side order numbers. This involves three steps. First, we need to make sure that if users entered anything, they entered integer numbers. It wouldn't work to send out @#$ orders of bread sticks, would it? Second, if the entries are not numbers, we need to let users know they made a mistake and give them a chance to correct it. Third, if there is a valid numeric entry, we need to add appropriate information to our output string. The following code does all of this:

    int bs = 0;
int bw = 0;
try
{
   if (!breadSticksText.getText().isEmpty())
      bs = Integer.parseInt(breadSticksText.getText());
   if (!buffaloWingsText.getText().isEmpty())
      bw = Integer.parseInt(buffaloWingsText.getText());
}
catch (NumberFormatException nfe)
{
   JOptionPane.showMessageDialog(frame, 
      "Side order entries must be numeric,\n" +
       "and must be whole numbers", 
      "Side Order Error", 
      JOptionPane.ERROR_MESSAGE);
}
if (bs > 0 || bw > 0)
{
   order += "Sides:\n";
   if (bs > 0)
      order += "     " + bs + " Bread Sticks\n";
   if (bw > 0)
      order += "     " + bw + " Buffalo Wings\n";
}


This code creates two int variables to hold the bread stick and buffalo wing order numbers, and it initializes them to zero. Then it tries to extract the numbers from the text fields, but only if they are not empty. It does this by using the getText() method to get the text from the text field, the isEmpty() method to see if the String is empty, and the logical not operator (!) to test for a field that is not empty. If there is something in either of the Strings, the parseInt() method from the Integer class tries to convert it to an int. If there's anything there that keeps the conversion from working, the NumberFormatException will cause an error to pop up so the user can correct it.

Once we successfully convert the numbers, we add appropriate text to our output string if either of them is greater than zero.

The last item we have to add to our output is the delivery address. The only error our user could make there that we could catch is to leave a field empty. We don't want to get into editing names and addresses for validity in this example. So we'll present an error pop-up if any of the address fields are empty; otherwise we'll add them to our output string. Here's how we'll do that:

    if (nameText.getText().isEmpty() ||
   addressText.getText().isEmpty() ||
   cityText.getText().isEmpty())
JOptionPane.showMessageDialog(frame, 
   "Address fields may not be empty.",
   "Address Error", 
   JOptionPane.ERROR_MESSAGE);
else
{
   order += "Deliver To:\n";
   order += "     " + nameText.getText() + "\n";
   order += "     " + addressText.getText() + "\n";
   order += "     " + cityText.getText() + "\n";
}
   order += "\n***END OF ORDER ***\n";


That completes the creation of the output string. If we get this far in the logic, we're ready to write the output to a file. We have done that before, so I won't bore you with the details. Here's the code:

    try
{
   PrintStream oFile = new PrintStream("PizzaOrder.txt");
   oFile.print(order);
   oFile.close();
}
catch(IOException ioe)
{
   System.out.println("\n*** I/O Error ***\n" + ioe);
}


And believe it or not, that's it! Give your program a try and let me know in the Discussion Area if you have any problems with it.

If you want to compare your code to mine, you can look at it here.
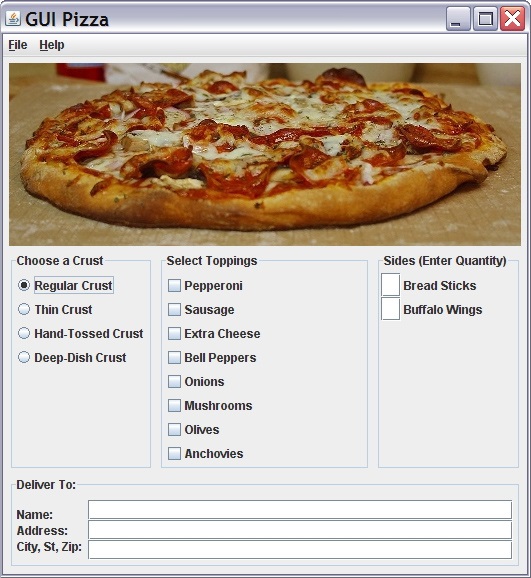
Complete GUI Pizza application

Chapter 5:
Summary

Well, that was quite a project! In the process of building our program, we learned about a number of Java GUI tools, including radio buttons, check boxes, text boxes, and borders. We also got more practice using labels, layout managers, pop-up dialog boxes, and output files. That's a lot of progress!

In our next lesson, we'll shift gears again and start looking at a group of Java classes called Collections to see what we can do with them.

Until then, have fun experimenting with your GUI windows.


Lesson 9 FAQs

Q: Wouldn't it be better to print an order like this instead of writing it to an output file that still has to be printed?

A: In a real-world application, that would probably be the way it worked. But printing is one of the things that are very hardware-dependent in the real world, so coding it is not consistent across platforms or printers. That's why, in this lesson, we stuck with writing an output file, which is usually simpler from a programming standpoint.

Lesson 9 Assignment


Your assignment for this lesson is to take the window you designed for the previous lesson (Lesson 8) and use listeners to make at least three of the actions work as you would like them to. You can attach the listeners to menu items, buttons, or other components in the window. Let me know what questions you have or problems you run into so we can sort them out.

Lesson 9 Quiz Answers

1. What is the purpose of an empty border?
An empty border inserts empty space around components to separate them visually.

2. How do you create pop-up dialog boxes for error conditions?
By using the JOptionPane's message dialog methods whenever conditions warrant.

3. How many listeners must a button or menu item have?
Any number, including zero.

4. What information is available to an inner listener class?
Information about any instance variables in the entire outer class.

5. Which of the following lines of code will copy the text from a JTextField object named tf to a String object named s?
s = tf.getText();


Lesson 9 Supplementary Materials